The backpacking season is here and I am extremely excited about it! I had the wonderful opportunity of residing in Seattle in Washington State for three years and these are the backpacking trips that I enjoyed the most. If you are in search of motivation for summer adventures and the greatest backpacking trips in Washington, you have come to the correct place. Let’s analyze the backcountry destinations in backpacking Washington for a taste of the finest experiences the Pacific Northwest can provide!
Planning ahead
If you venture into the wilderness or backcountry without a plan, unexpected and negative things can occur. Conducting thorough research can prevent dangerous situations, especially for inexperienced individuals.
- Visit the National Park Service websites for trails and hiking, and wilderness and backcountry camping.
- Request the proper permit. Check the park’s page on nps.gov to see if the park requires one.
- Obtain detailed maps of trails you plan to hike. Locate campsites and water sources on the map and plan accordingly. Expect to cover 5 to 10 miles a day, depending on the terrain.
- Download GPS and compass apps to your phone. Don’t forget to pack a battery-operated phone charger.
- Before you leave the trailhead, make sure somebody back at home knows where you’re headed and how long you’ll be gone.
Packing your pack
Ensure that you bring everything that you require and nothing that is unnecessary. By utilizing a lightweight pack, it is typically feasible to accommodate all necessary backpacking gear with a pack that weighs 40 pounds or less. Maintain balance by locating the heaviest items in the middle and arrange lighter items around them. Position items that necessitate frequent access, such as water, food, and maps, in a readily accessible spot.
Apparel
When considering what to pack, it is important to layer your clothing due to the possibility of rapidly and significantly changing weather based on your location and the time of year.
- Good hiking boots
- Synthetic hiking pants or shorts
- Long underwear
- Synthetic shirt
- Fleece or hoodie
- Light jacket
- Waterproof jacket and pants
- At least one pair of socks for each day
- Cold weather hat/beanie and light gloves
- Light-weight sandals to wear around campsite
In order to maintain the same meaning while rephrasing the text, here is a step-by-step breakdown: 1. “Shelter” – This word refers to a place that provides protection or a home for individuals. 2. “Shelter” can be thought of as a facility or structure that offers safety and sanctuary for people. 3. When discussing shelter, it usually means having a place to stay that safeguards individuals from external elements or harm. 4. The concept of shelter revolves around the idea of finding a secure and protected space for individuals to live or take refuge in. By following these steps, we have managed to rephrase the text while maintaining the same meaning.
- Sleeping bag (down or synthetic)
- Inflatable or closed-cell foam pad
- 3-season tent
Essentials are to be thought about step by step.
- First aid kit – Read up on how you pack a good first aid kit
- Headlamp
- Matches or lighter
- Duct tape and/or repair kit
- Pocket knife
- Environmentally-friendly toiletries
- Trowel
Eating right
The amount of food you bring for your trip depends on the duration and the number of people involved. If you are going on an overnight hike alone, it is likely that you can rely solely on prepared food, as long as it is high in calories and protein. Good options for a short trip include granola bars, trail mix, beef jerky, nuts, fruit, and a couple of chocolate bars. However, if you are part of a large group embarking on a weeklong trek, it is probable that you will need to cook meals, so it’s important to plan the menu in advance. Using dehydrated food will help save space and reduce weight. In addition to the food itself, do not forget to bring the following items:
- Lightweight backpacking stove and fuel
- Compact pot set and utensils
- One cup, bowl, and spork for each person
- Sponge and soap
- Don’t forget water! Carry a minimum of 32 ounces of water with you at all times, and keep a filter or other system handy so that you can purify water from springs and streams.
Stick to Established Trails and Campsites
Until later in my backpacking career, I didn’t fully grasp the significance of this particular matter. Deviating from the designated trail can cause damage and have negative consequences, such as erosion or destruction of delicate ecosystems. An example of this can be identified when encountering a seldom-used path branching away from the main trail.
The same applies to campsites as well.
- Camp at least 200 feet from lakes and streams. I see this one violated a lot.
- When in relatively untouched areas try to camp on durable surfaces like rock, gravel, dried grass – areas that wont leave an impact
If you have gone outside a few times, you have likely observed the damage that humans inflict. Take responsibility for your actions to ensure it remains an enjoyable place in the future.
Our List
Enchanted Valley
- Location: Olympic National Park
- Length: 30.6 miles roundtrip
- Elevation Gain: 4,642 ft
- Best Months: March – September
- Difficulty Level: Hard
- Permits: Permit is required
- Bear Cannister Required
- No Dogs
Enchanted Valley truly lives up to its name, exuding enchantment. I mean, imagine waterfalls cascading down majestic mountains on either side, Pacific Northwest fog gracefully enveloping key spots, clusters of towering trees, flowing rivers, and an abandoned Chalet with an intriguing past. It is important to note that this hike is far from easy, as it covers a distance of 15 miles with significant elevation gain.
If you have no backpacking experience, it is not advisable to go on this trip as your first backpacking experience unless you are accompanied by someone who has experience.
I want to clarify that this is not a hidden location. It can be extremely crowded and permits are necessary, which can be obtained in advance or on the spot. The number of permits might be limited due to erosion and the harm caused by human activity. If you do manage to visit this magnificent place, I have confidence that you will treat it with respect and follow the practice of leaving no trace.
Gem Lake
- Location: Mount Baker Snoqualmie National Forest
- Length: 11.0 miles round trip
- Elevation Gain: 2,670 ft
- Difficulty: Rated difficult (Moderate option is Snow Lake!)
- Solitude: Crowded on trail and around Snow Lake, minimal-moderate traffic on the trail to Gem Lake, minimal people camping at Gem Lake (We were one of 2 tents that overnighted on a Thursday in July)
- Camping: first come first serve in established campsites. NO campfires
- Bathrooms: at trailhead and at Snow Lake
- Dogs: allowed on leash
- Fee: Northwest Forest Parking Pass
Gem Lake was an incredibly memorable overnight experience for me! It had been nearly a year since I last went backpacking, and having relocated from Washington, this trip was a fantastic opportunity to return and embark on.
Waptus Lake
- Location: Alpine Lakes Wilderness
- Length: 17.4 miles round trip
- Elevation Gain: 2,434 ft
- Best Months: April – October
- Difficulty Level: Hard
- Dogs: Allowed on leash
- No Permit Necessary
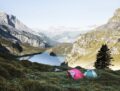
Accidentally, my friends and I ended up camping at Waptus Lake instead of continuing our journey towards Spade Lake, which would have required an additional 9 miles round trip and a 3,500 ft climb. The reason for our change of plans was the presence of dark clouds and lingering snow above the intended destination.
Now, this has become one of my top backpacking memories! The lack of other individuals and the tranquil lake made it a truly remarkable place to set up camp. Moreover, there were numerous spots to camp along the route, allowing for a two-day journey to reach this destination.
Marmot Pass
- Location: Buckhorn Wilderness
- Length: 12.8 miles round trip
- Elevation Gain: 3,917 ft
- Best Months: July – November
- Difficulty Level: Hard
- Dogs: Allowed on leash
- No permit required
- Northwest Forest Pass Required
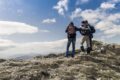
Due to its popularity, this trail is often crowded. The reason for its popularity is the unforgettable cloud inversion I witnessed here, which was quite absurd. In addition, there are numerous camping spots available, and the trail extends further along a ridge, offering magnificent panoramic views for those who are willing to venture a little more. I must admit that this trail was quite challenging and took a toll on me, but it was definitely worth it.